🚩 Stage 2: Strategist client onboarding – first steps
The Sales rep may be the one signing the deal...
...but it's the Strategist that will ensure that deal turns into a successful client engagement.
Their work is crucial. Here's what they should do in the client onboarding process.
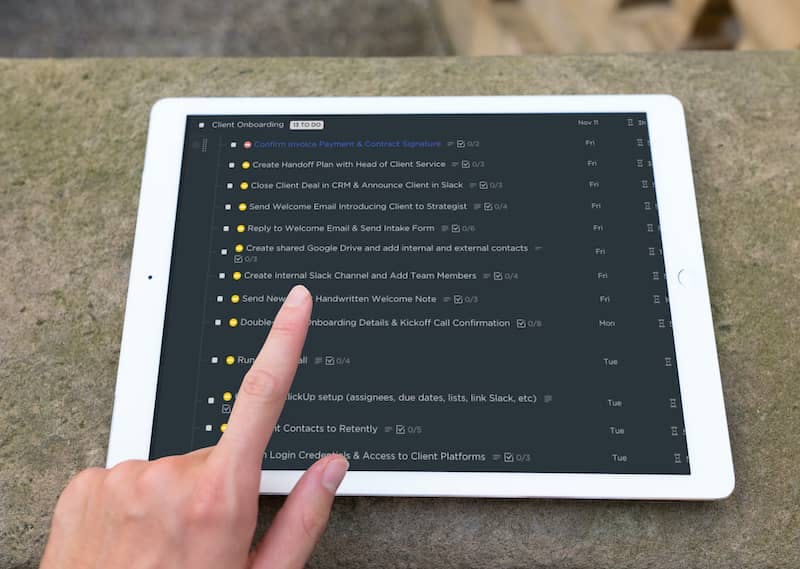
✅ Reply to Welcome Email & Send Intake Form
The Strategist begins by replying to the welcome email and sending the intake form.
And we've got exactly what you need to get started here: examples of both the intake form and the email reply.
- OPTION #1
- OPTION #2
- OPTION #3
- Here's a link to our shared onboarding form. Please take 10 minutes to fill it out; it'll help us deliver the best results for you!
- Can you get that done no later than Monday morning so we have time to review it ahead of our call on CLIENT KICKOFF DAY?
- Our billing team (cc'd here) will coordinate payment details with you.
- Hit Reply All on the Intro email to the client.
- Include the Sales Representative as CC
- Customize the template in the description field above and send the email! Specifically, customize:
- Your role in the 2nd sentence
- The day of the week you onboard clients
- Add 2-3 times that you're open and customize to their timezone (or include a scheduling link)
✅ Create shared Google Drive and add internal and external contacts
Organizing internal files on Google Drive may not be the most glamorous work, but it can save you tons of "where the heck did I put those slides?"-flavored frustration down the line.
We've got a handy guide for you to follow here:
Resource: How to Set up the Best Google Drive Folder System for Your Agency
- Clone "Client Template" folder in Google Drive
- Pull client emails addresses from intake form and share Google Drive folder with them
- Add client contract to "Contract" folder in ClickUp. This will be on the deal in the CRM.
✅ Send New Client Handwritten Welcome Note
Hardly a "must-have" step, I'll admit, but why not make your new client feel extra appreciated and welcome with a handwritten note?
Here are the exact steps for this:
- Write the "Thanks for joining" note
- Grab client mailing address from completed questionnaire
- Snail mail note to client
✅ Create Internal Slack Channel and Add Team Members
An argument could be made (especially by ClickUp fans like ourselves) that you could use only ClickUp to house all communications with a client.
With that said, Slack can be useful to facilitate quick communication.
(And steal some quirky emojis from the client's Slack, which sadly is not a thing in ClickUp yet!)
And you can easily make Slack and ClickUp work well together by following this process:
- In Slack, create a new Private Channel and name it #client-ClientName (replace ClientName). (If you don't have permissions to create a new Private Channel, have Slack admin set it up for you.)
- Add all involved team members for each appropriate service to the channel.
- Add leadership team to the channel.
- After creating the channel, go to the Integration settings in ClickUp and link this space to the new private client channel you just created in Slack (if you don't have permissions, get an admin's help).
BONUS
Download the Complete ClickUp for Agencies Guide FREE
The 47-page guide includes graphics, checklists, and links to how-to videos so you can actionize your ClickUp plan.
🚩 Stage 3: Checks and housekeeping after initial setup
In this stage, a team member in the Admin seat and the Strategist perform some additional checks and housekeeping ahead of the kickoff call.
✅ Double-Check Onboarding Details & Kickoff Call Confirmation
Done by: Admin
In this step, the Admin team member checks all the previous steps to make sure nothing got missed. Teamwork makes the dream work!
- SOW/MSA Signature
- Payment en route or approved
- Onboarding call scheduled and on calendar
- Intake form completed + Slack announcement made
- Shared Drive is correct + personalized
- Subscribe to the client's email list (if possible)
- Add Google Alerts for both the business and founder's name (if appropriate)
- Intro yourself to the client
✅ Add Client Contacts to NPS flow in Retently
Done by: Strategist
Consistent client feedback is key to spotting issues before they become fires. The work to get that feedback begins already on the onboarding stage.
Enroll each appropriate member of your client's team (based on what you learned during the kickoff call) into a customized NPS campaign so you can keep your finger on the pulse of your client health.
If you do not yet have NPS set up and need a tool for it, we recommend Retently.
- Login to Retently
- Select "Audience" on the left side menu.
- Select "Add customers" in the upper right.
- Add the POC and other stakeholders and save.
- Return to "Audience" tab, select users, and enroll them in the NPS campaign.
✅ Confirm Login Credentials & Access to Client Platforms
Done by: Strategist
Confirm access has been granted to all the necessary platforms. Save usernames and passwords in a shared company password vault like 1Password or LastPass.
- Create a shared folder in the company password vault.
- Add login credentials for key platforms.
- Share folder with the management and delivery teams.
🚩 Stage 4: Kickoff Call
Run by: Strategist
Attended by: Admin, Sales
Finally, we get to the next big moment, which is the kickoff call.
You want to put your best foot forward here, so here's an agenda you can steal, including a presentation template:
Example Kickoff Call Agenda Presentation (Google Slides file; the link will ask you to make a copy)
- Meeting Location - add the meeting link or physical location
- Required Roles - Account Manager, Sales Representative, Client Point of Contact, Client Executive Sponsor
- Introductions – 5 minutes - Sales Representative leads introductions.
- KPI Scorecard Review – 5 minutes - Verify the metrics to be owned by each party.
- Strategic Initiative Review – 5 minutes - Sales Representative leads a review of the mutually agreed upon goals gathered in the sales process
- Project Plan Review – 5 minutes - Account Manager leads review of the project plan designed to achieve the shared goals.
- Meeting Cadence Review – 5 minutes - Account Manager leads review of the meeting schedule for both the point of contact and the executive sponsor. Meeting dates and times are set. Invitations are sent.
- Intake Form Review – 10 minutes - Account Manager leads review of the information submitted by the client. This is the opportunity to ask for clarity and context on anything shared via the form.
- Conclude – 5 minutes - Recap the To-Dos for the next meeting, identify information that needs to be shared with the rest of the team, and have each person rate the meeting from 1 to 10.
Checklist (for each role):
- Review the Questionnaire and Sales Notes and prepare any questions you have for the client
- Prepare any presentation docs and have them ready to go live before starting the kickoff call
- Make sure you're in a well-lit area with no background noise (use video)
- (Strategist only) After the call, email the client the timeline for deliverables for the next 30 days and outline any task assignments the client must complete
The Only Fully Guaranteed Agency Operations Improvement Framework
Get 360 clarity into your operations or your money back, guaranteed.
🚩 Stage 5: After the kickoff call
After the kickoff call, there's one more important step for the Strategist to go through. We'll give a (simplified) example of what we do in ClickUp after the call; your flow may vary depending on your PM tool and setup.
✅ Complete ClickUp setup (assignees, due dates, lists, link Slack, etc)
Based on what you've learned during the kickoff call, it's time to streamline ClickUp, get tasks assigned to the right people, delete work that's not relevant at this point, and and set due dates based on the timeline we now know.
- Delete all lists and/or tasks that are not relevant (based on scope)
- Filter tasks by the Role custom field and assign to the correct team members
- Adjust due dates as needed.
- Remove the Planning tag from all tasks (once planned)
- Add Client to the Account Dashboard and fill out all relevant fields.
- Go to the Time Tracked by Client Dashboard and duplicate an existing widget to create a new widget for this client, then update the location to correctly track time from this client.
And that's it—those steps should take you all the way from "contract signed" to "ready to start delivering some great work for this client"!
But of course, this is not where the effort ends if you want to get a 10/10 NPS score from your client down the line.
Cancel chaos.
Create clarity.
You can build a happier, more productive, more profitable team with ClickUp. We'll show you how.
What's Next After Nailing Client Onboarding?
You read this because you want your client onboarding to be smooth and pleasant, and set your client up for success.
(Don't forget to grab the free client onboarding ClickUp template if you haven't yet.)
Client Onboarding ClickUp Template
Access our pre-built Client Onboarding ClickUp template, 100% free.
But as you know, onboarding is only one part of your overall client experience.
To make sure your clients enjoy not just your first days and weeks with you, but the whole engagement (and get that perfect NPS score), you should consider implementing the ZenPilot System for Agencies.
Start with our free ClickUp for Agencies Guide.
It'll teach you the space/folder/list hierarchy, internal processes, and daily/weekly/monthly habits you need to make your agency run smooth as butter on ClickUp.
Alternatively, for a deeper dive into crafting a great client journey, here's a blog post (and a podcast episode) to inspired you:
The Proven Framework Every Agency Should Use to Create a Stellar Client Journey
Thanks for reading!
If you have questions or comments about this post, don't hesitate to add me on LinkedIn and let's chat.


