How to Integrate Slack & SupportKit for Live Chat
To chat with Gray and have ZenPilot lead your team through the last project management implementation you'll ever need, schedule a quick call here.
Looking to set up free live chat on your website? If so, you’ve come to the right place.
Last episode, we talked about how using Slack will improve and speed up team communication. One of the benefits of Slack over other team chat apps is its extensive list of integrations. One of these integrations includes SupportKit—an app that makes live chat on your website possible.
The best part is that you can manage these live chats directly through Slack, right where you’re already communicating. And even better—it’s free!
How to Integrate Slack and SupportKit for Live Chat
How It Appears on Your Site
Here’s how live chat appears on our agency’s site for users.

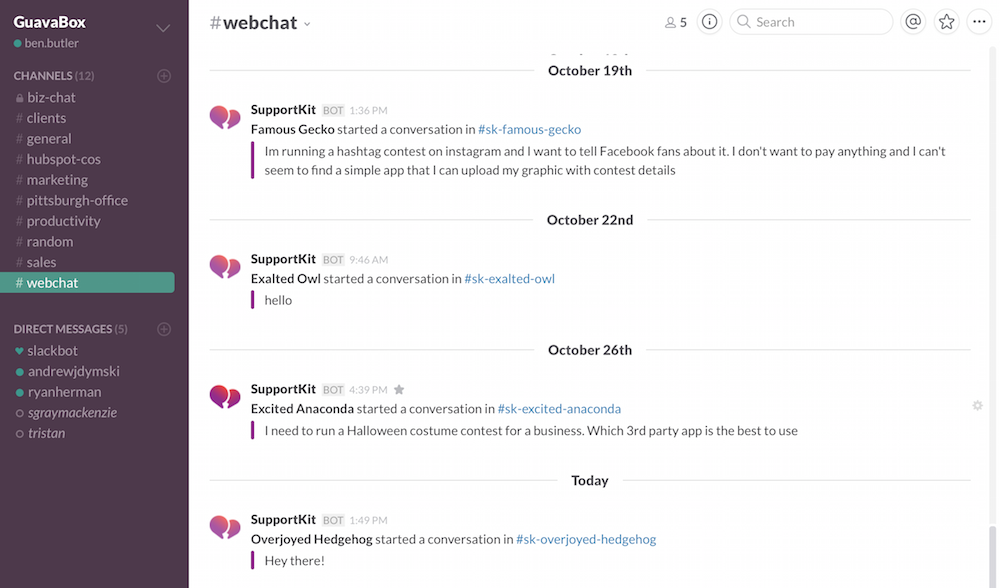
And how that message comes through to our Slack.

Important Note
If you’re using HubSpot, you might be looking for a solution that creates user profiles. SupportKit isn’t the best solution for this. Zopim and Olark are better for this.
For us, we don’t have an overflow of Live Chat conversations, so we’ve kept out implementation relatively simple for the time being.
Step-By-Step How to Integrate SupportKit and Slack
STEP 1. First thing is first—sign up for a SupportKit account.
STEP 2. Next, set up your application. I recommend utilizing the name of your organization for this.
STEP 3. You’ll need to integrate Slack. To do this, simply press the Authenticate and you’ll be prompted to do so.
STEP 4. In order to respond through Slack, you have to set up a new Slash Command Integration. SupportKit offers a helpful set up steps to help you complete this.
STEP 5. Once you’ve implemented a new Slack Command Integration, select the Channel you want new live chats to filter to.
For us, we created a new Channel simply dubbed webchat. In your dedicated Channel, you’ll be able to respond to new chats by entering /(your Slash Command) and your message. Each time you want to respond, you have to use the Slash Command.
STEP 6. You’ll have an additional option here. New live chat conversations will automatically open in new Channels. For instance, if I respond to a new chat—using my Slash Command—it will open that conversation in an entirely new Channel. This comes in handy if your team handles multiple chat requests at a time.
This can really clog up your Channels though. Under the Automatic Channel Archiving option, you can dictate when you want these chats to archive themselves by hours of inactivity. This saves you the trouble of having to archive them all by hand.
If the person comes back to the chat after it’s been archived, Slack will auto-reopen the Channel so the conversation can continue where it left off.
Happy Chatting!
So there you have it—the method for integrating SupportKit and Slack. If you have any other questions regarding this topic, please let me know in the comments below.


