If you've just created a ClickUp workspace for your internal marketing team but aren't sure how to set it up effectively, don't worry. As ClickUp's first ever and highest-rated solutions partner, having helped close to 3,000 different teams implement the platform, we've put together our ultimate set up guide for internal marketing teams trying to make the most out of their ClickUp workspace.
This guide will walk you through everything you need to know when you're getting ClickUp set up for your team.
And if at any point you're ready to just hit the "Easy Button" and have ClickUp's highest-rated solutions partner lead you through this process, book a call with my team here.
Let's get started!
The Best ClickUp Hierarchy for Marketing Teams
The foundation of an effective ClickUp setup is your hierarchy. The ClickUp hierarchy, when designed correctly, is key to unlocking the views and dashboards needed for visibility and reporting.
Let's break down the ideal hierarchy for a marketing team.
Workspace and Spaces
At the top level, you'll have your ClickUp workspace.
For most companies, you'll likely have one workspace that encompasses all departments. Within that workspace, you'll create Spaces for each major team or function, like Marketing, Sales, Product, etc.
For an internal marketing team, you'll have one "Marketing" space where all of your work can live.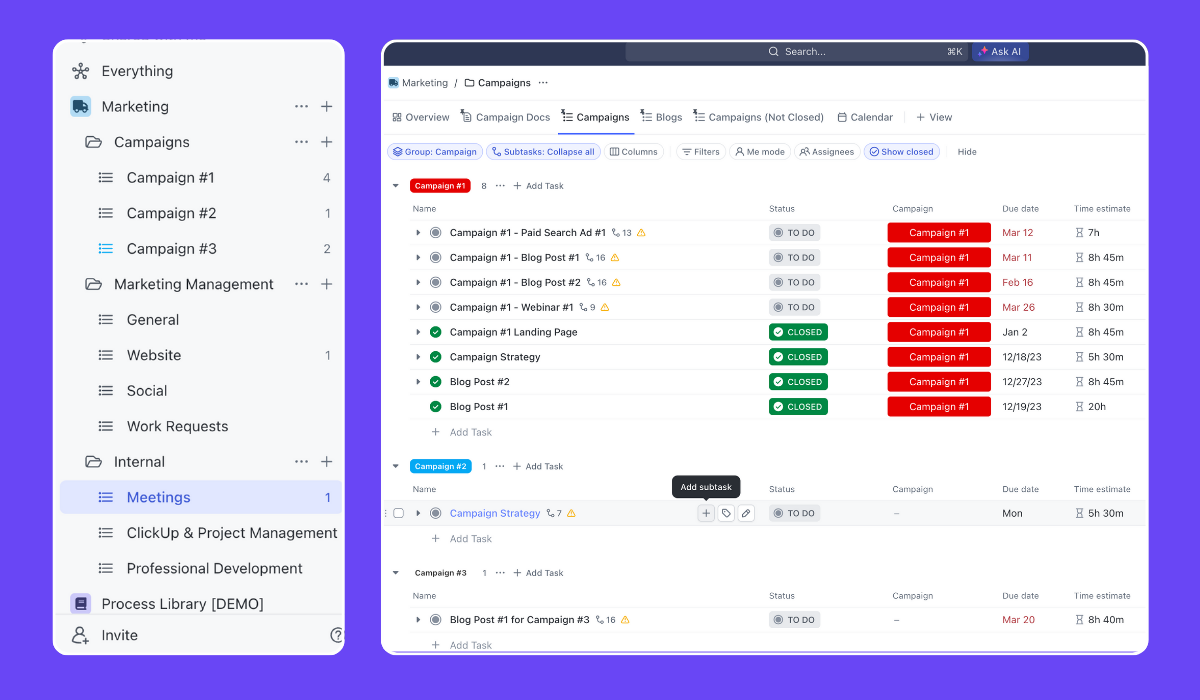
Marketing Space Folders
Now, within your Marketing Space, you'll have Folders and Lists to organize your work.
We recommend having at least three key folders:
1. Campaigns Folder
This folder will house all your marketing campaigns. Each campaign will have its own List within the folder. This allows you to easily track and report on the work and results for each individual campaign. When a campaign wraps up, you can archive its list to keep your workspace clean.
2. Marketing Management Folder
Not all marketing work falls neatly into a campaign. The Marketing Management folder is the place for all those other other tasks and projects, organized into Lists by work category. For example, you might have lists for Website, Social Media, Content, Creative, etc.
You can also use the Marketing Management folder to handle incoming work requests from other teams. Set up a Form to capture all the necessary details of each request, and have submissions flow into a dedicated List. From there you can triage and assign out the work.
3. Internal Folder
It's important that ClickUp acts as your single source of truth, capturing all work your team is doing. The Internal folder is the place to track all the work that supports your team and its operations.
This could include things like team meetings, professional development, process documentation, and one-on-ones. Having a dedicated space for this internal work ensures you have full visibility into your team's workload and capacity.
Plus, you can even store meeting docs in ClickUp to run your team meetings, 1-1's, etc.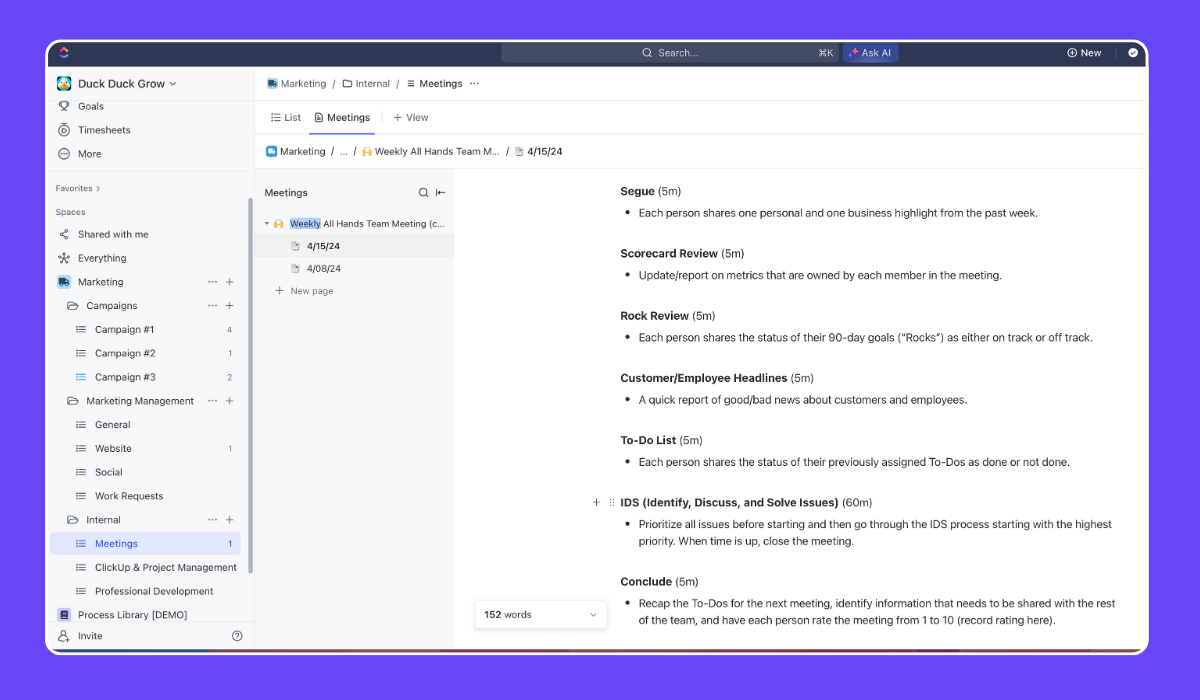
Now, with this hierarchy in place, you'll be able to efficiently organize your work and easily report on progress both within and across campaigns.
Tasks & Subtasks
At the Task level is where the real work happens. Every blog post, every landing page, every email gets its own Task.
If a deliverable has multiple steps or stages (which they all do), map those out as Subtasks.
By breaking things down to this granular level, you can easily see the status of every piece of work, who's responsible for what, and where things are getting stuck. No more wondering "whatever happened to that ebook we talked about last month?".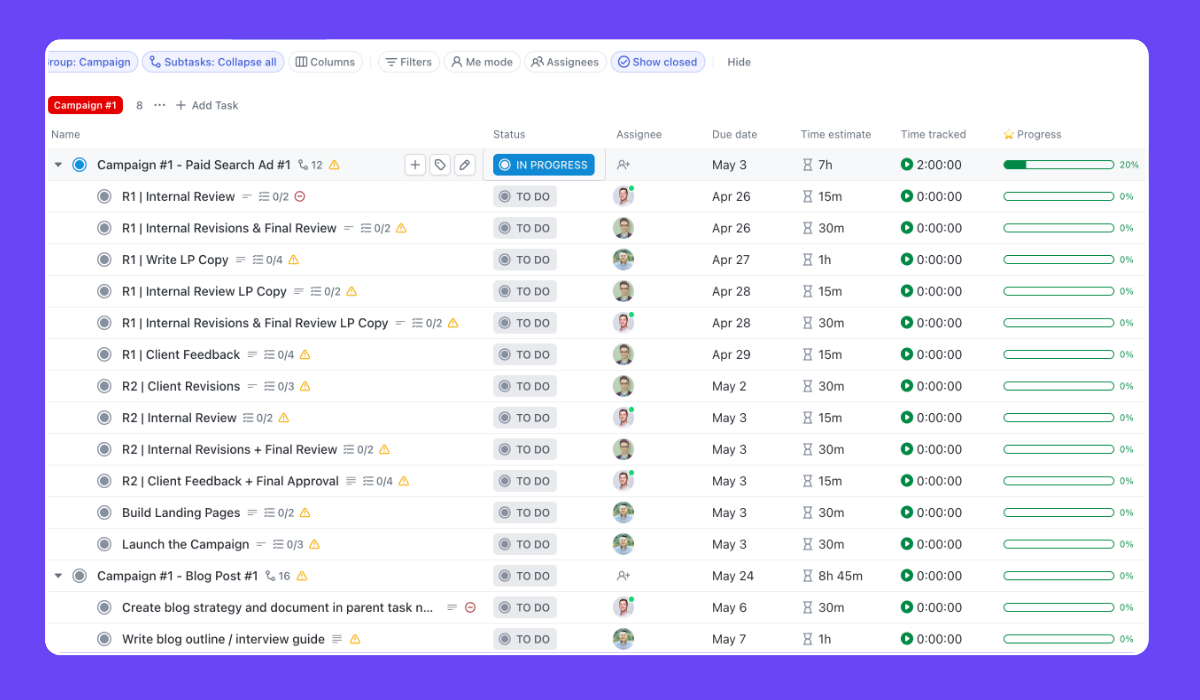
And to help with this, you should be building all of your deliverables and projects out in ClickUp—tasks, subtasks, checklists, instructions, dependencies, etc.—and saving them as templates.
Creating a Process Library in ClickUp
With your core hierarchy established, it's time for the real magic - templatizing your repeatable processes. This is a game changer for productivity and consistency. No more starting from scratch or reinventing the wheel every time.
We recommend creating a dedicated "Process Library" Space in ClickUp. This is where you'll build and store your templates for easy access and updating.
And please, don't skip this step. This is important.
Just take Melanie Brook's (Principal, Creative Operations at LegalZoom) experience. Before they had processes documented and templated, it was a bit chaotic, but after they designed processes for everything they did, there was much more clarity.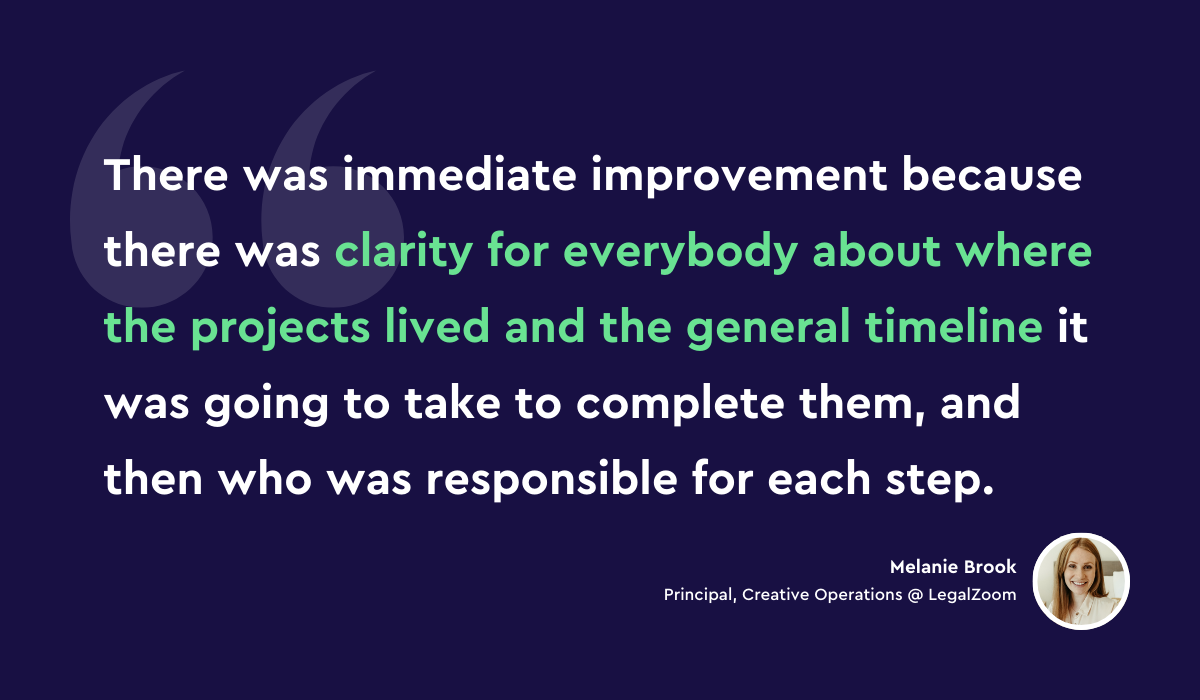
Structuring Your Process Library
Within your Process Library space, create folders and lists to organize your templates. You may just have a few folders for marketing work and internal work, but underneath those folders is where you can use lists to organize your processes into work categories. You may have lists for:
- Content Production
- Social Media
- Events
- Ads
And so on. The key is to categorize your templates in a way that aligns with your team's core functions and deliverables.
Within each of those lists, create tasks for specific deliverables or projects. For example, in your "Content" list, you might have tasks for:
- Blog Post
- Ebook
- Webinar
- Case Study
- Whitepaper
Templatizing Your Processes
Now for the fun part - actually building your templates! The key here is to think through every step and every role involved in executing that particular deliverable or campaign.
Let's use a Blog Post as an example:
Create a Task for the blog post itself. This is your parent task.
Within that parent task, create Subtasks for every step in your blog post process, for example:
- Ideate topic
- Outline post
- Write draft
- Design graphics
- Review and edit
- Publish
- Promote
Yes, this is a very simplified version, but that's what you want to do. Get every step listed out to help pass work back and forth through the team until the project is complete!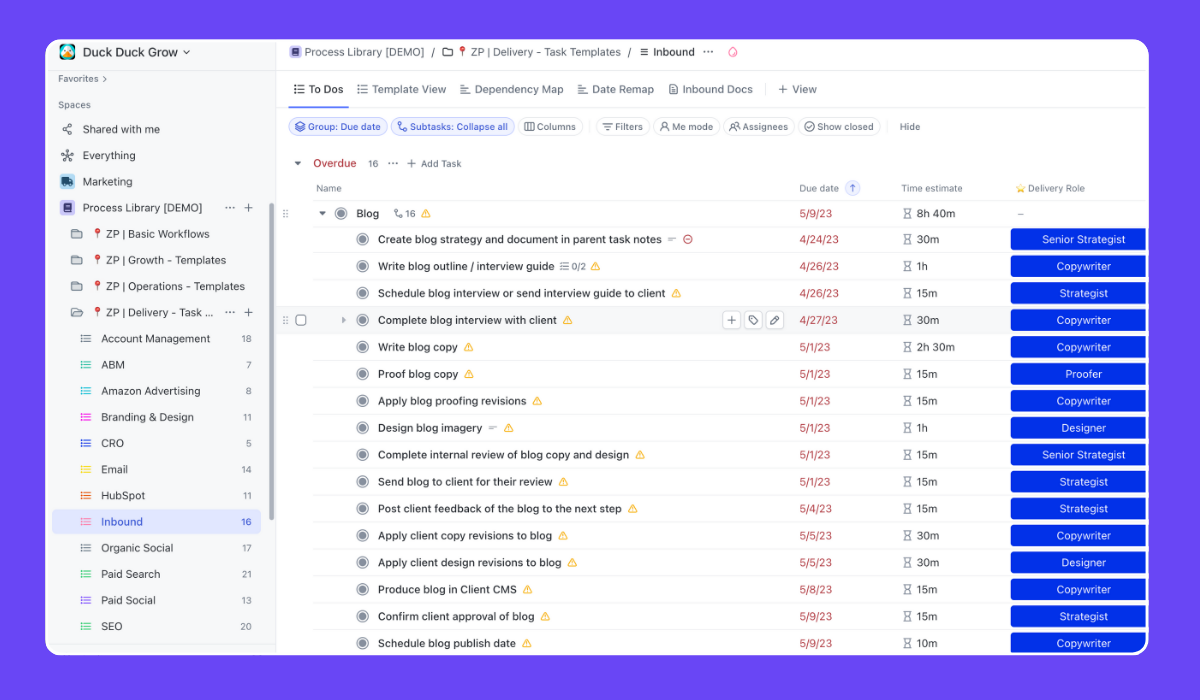
Now, when your tasks are all laid out, you'll want to add some more detail:
- Add relevant Custom Fields (more on this in a bit)
- Set time estimates for each subtask
- Add in due dates (these can just be dummy dates for now)
- Link dependent tasks (e.g. can't publish until review is complete)
- Use the task description to link to an appropriate SOP
- Add in checklists for steps in that task that someone should not forget
Once you're workflow is complete, save this as a template in the ClickUp template center.
Voila! You now have a reusable blog post template. Anytime you need to create a new blog post, simply duplicate this template, customize the details, and get to work.
Rinse and repeat this process for every core deliverable and campaign your team executes regularly. Having these templates on hand will save you hours and ensure no steps get missed.
Related: How to 10x Productivity With ClickUp Templates
ClickUp Custom Fields Marketers Need
To unlock ClickUp's full potential for visibility and reporting, you'll want to take advantage of Custom Fields. Think of Custom Fields like tags or labels you can apply to your tasks to provide additional context and enable more advanced grouping, filtering, and reporting.
And though this is not an exhaustive list, here are four key custom fields we recommend for marketing teams:
1. Delivery Role
Most marketing work involves multiple roles or skill sets, like writing, design, strategy, etc. By creating a dropdown custom field for delivery role, you can tag each task with the role(s) responsible for completing it.
You should have a delivery role labeled on every subtask in your process library. This allow you to easily assign work using ClickUp's bulk action toolbar.
Additionally, this custom field also helps with resource planning and hiring - you can easily see if you have enough capacity for each role based on upcoming work. And if you don't have enough copywriters on the team, maybe it's time to hire one!
2. Work Category
What type of marketing work is the task? Content, creative, website, social, etc?
While you may organize some of these into dedicated lists, a dropdown custom field called "work category" allows you to tag and group tasks across multiple lists or campaigns by work category.
This is helpful for viewing and reporting on specific types of work. If you want to see how much time you spent working on website or content work, this custom field will help you do that.
And if you want to get even more granular reporting and insights, you could even add another dropdown custom field called "Deliverable Type". The options for this would be things like blog, landing page, podcast, case study, etc.
You can pair this with the work category field to see how much time or effort you put in to content for a given month, and then see how much effort you put in to blogs, podcasts, etc.
3. Campaign
For any tasks that are part of a larger campaign, you'll want to tag them with a dropdown custom field called campaign. This allows you to easily filter and report on all work associated with a particular campaign.
Essentially, every campaign would have it's own dropdown option, and you'd continue to add more options as you add more campaigns.
Every task that is associated with a campaign, would get this custom field applied to it.
And the cool part is, this custom field doesn't have to be manually added to every task—it can be automated!
Just add an automation at your campaign list so that whenever a task is added to that list, the campaign custom field is automatically applied.
Adding Work to ClickUp
With your hierarchy, custom fields, and process templates all in place, you're ready to start adding work into ClickUp. Let's walk through the process for setting up a new campaign.
1. Create a New Campaign List
Start by creating a new List in your Campaigns folder for the campaign. Use a naming convention that makes sense for your team, like "Campaign Name - Month".
To make this process faster, you can also create a campaign List Template that includes any standard views, subtasks, or docs you include in every campaign.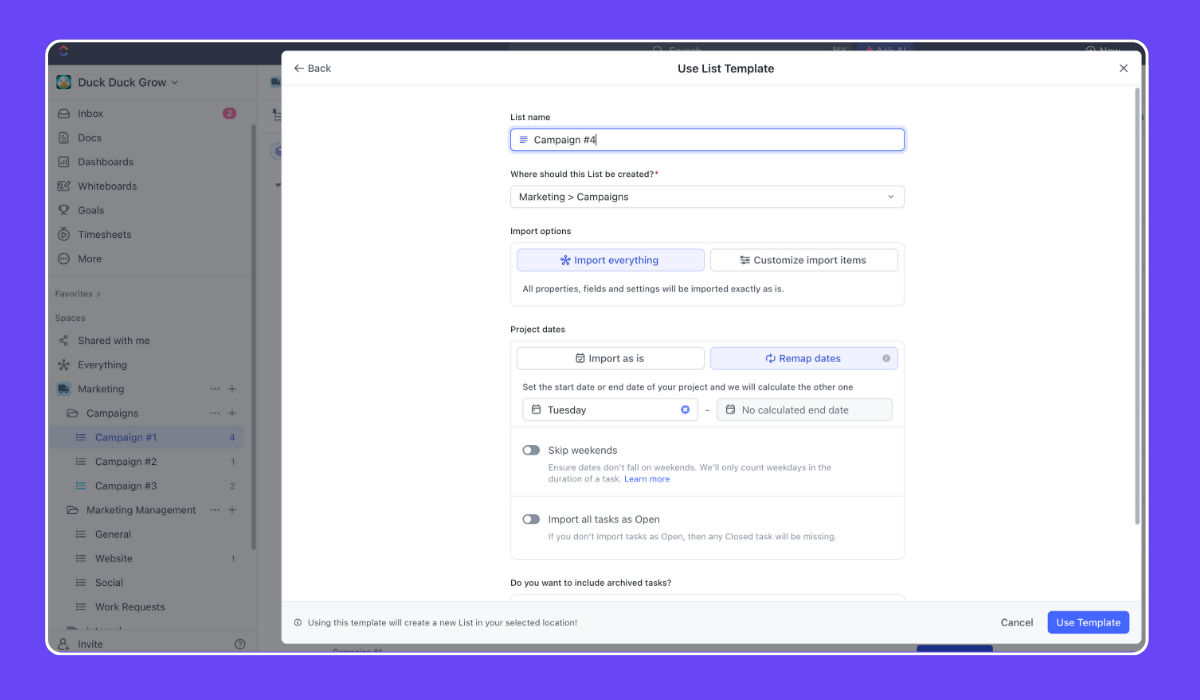
2. Define the Strategy
Before diving into tasks and deliverables, take time to align on the campaign strategy.
I'd recommend creating a Campaign Brief doc directly in ClickUp. Your brief should cover items like goals, target audience, key messages, budget, timeline, etc.
Attach this doc directly to your campaign list for easy reference. Or keep them all at the campaign folder level to keep them centralized.
When you've decided on the deliverables for your campaign, you can start using your process templates you created to start creating and assigning work.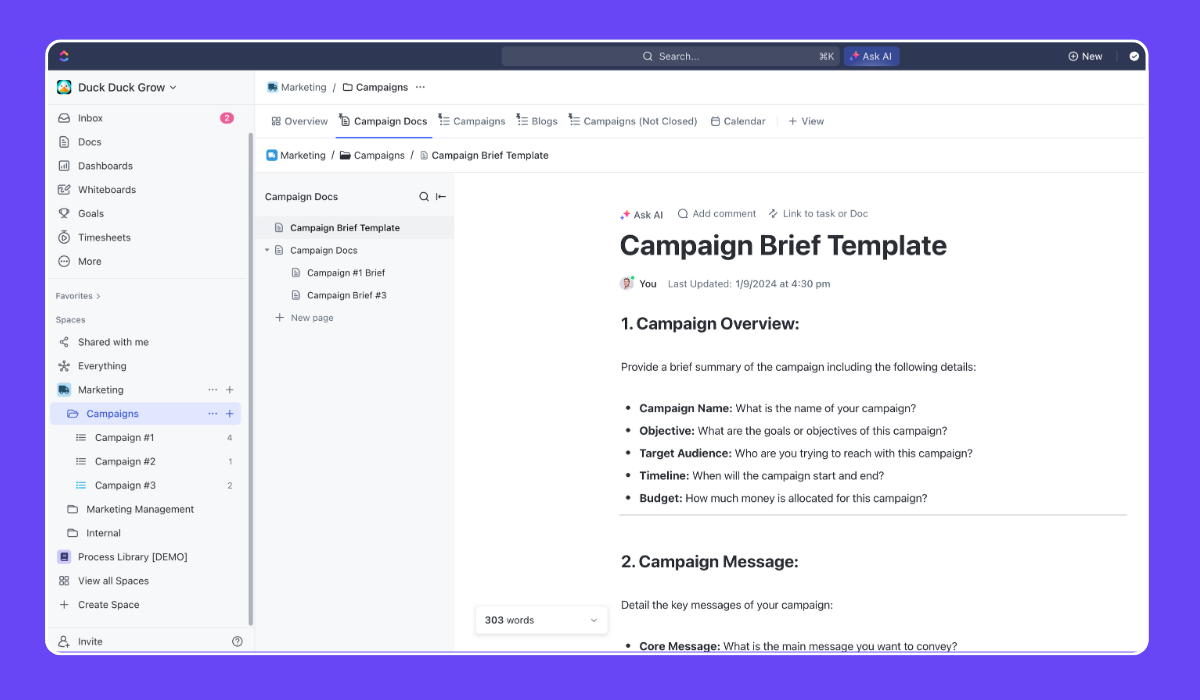
3. Deploy Your Processes
To start deploying work, navigate to your newly created campaign list, find the template center, and then find your template.
When you go to deploy your template, you can select a due date for that deliverable and remap the entire workflow. This is huge.
Continue with this process until your have all of your deliverables planned out inside of ClickUp. Now it's time to assign work!
4. Assign Tasks
With all your deliverables built out, it's time to assign the work. ClickUp makes it easy to group tasks by a custom field.
You'll want to create a view that groups tasks by your delivery role custom field. If all of your tasks have a delivery role on them, this process will be very easy.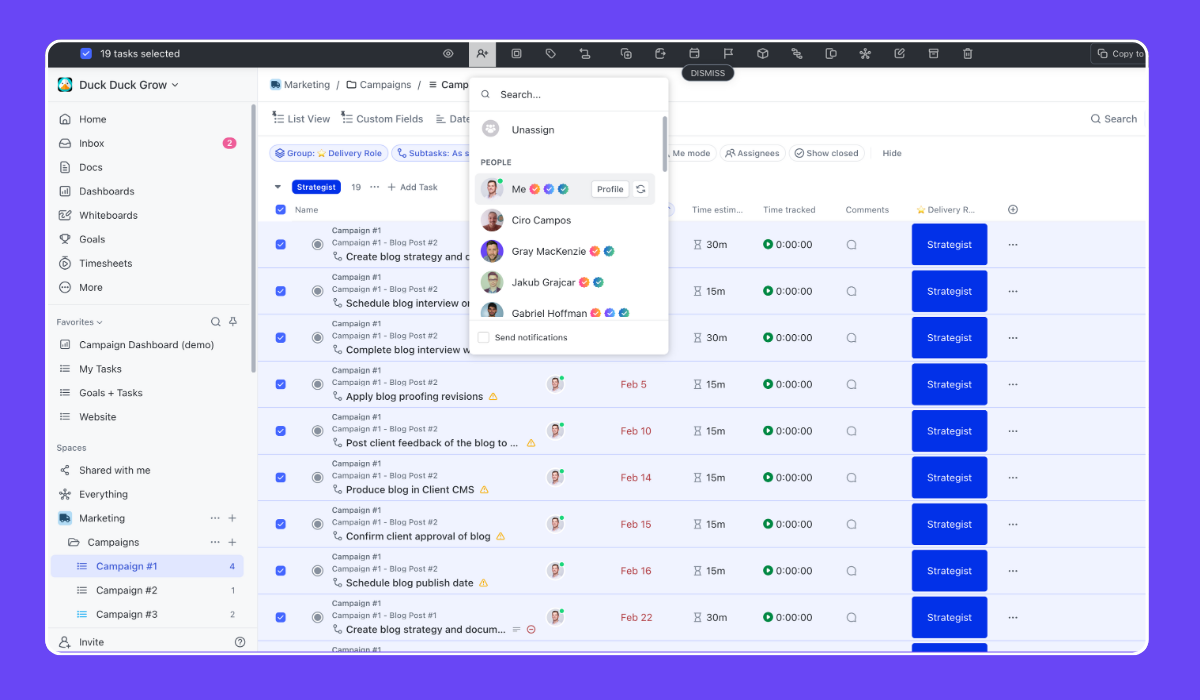
When your tasks are all grouped together by delivery role, select the role and use the bulk action toolbar to assign the work out!
5. Start Working
Now, when work is all assigned out and the team is ready to roll, it's time to begin working inside of ClickUp.
But to make this a bit easier for your team, you'll want to have a few views in place for your individual contributors, project managers, and leadership.
BONUS
Download the Complete "How to Use ClickUp" Guide FREE
Get the complete 56-page guide to learn how ClickUp's #1 solutions partner uses ClickUp.

ClickUp Views for Better Visibility
One of the major benefits of using ClickUp is the ability to create custom views that provide visibility into your work in different ways.
Here are some key views we recommend for marketing teams:
1. My Tasks View
As an individual contributor, the most important view is seeing all the tasks assigned to you across projects. ClickUp makes this easy with the My Tasks view. This view automatically filters tasks to only show those assigned to the current user. You can group this view by due date to see your upcoming deadlines at a glance.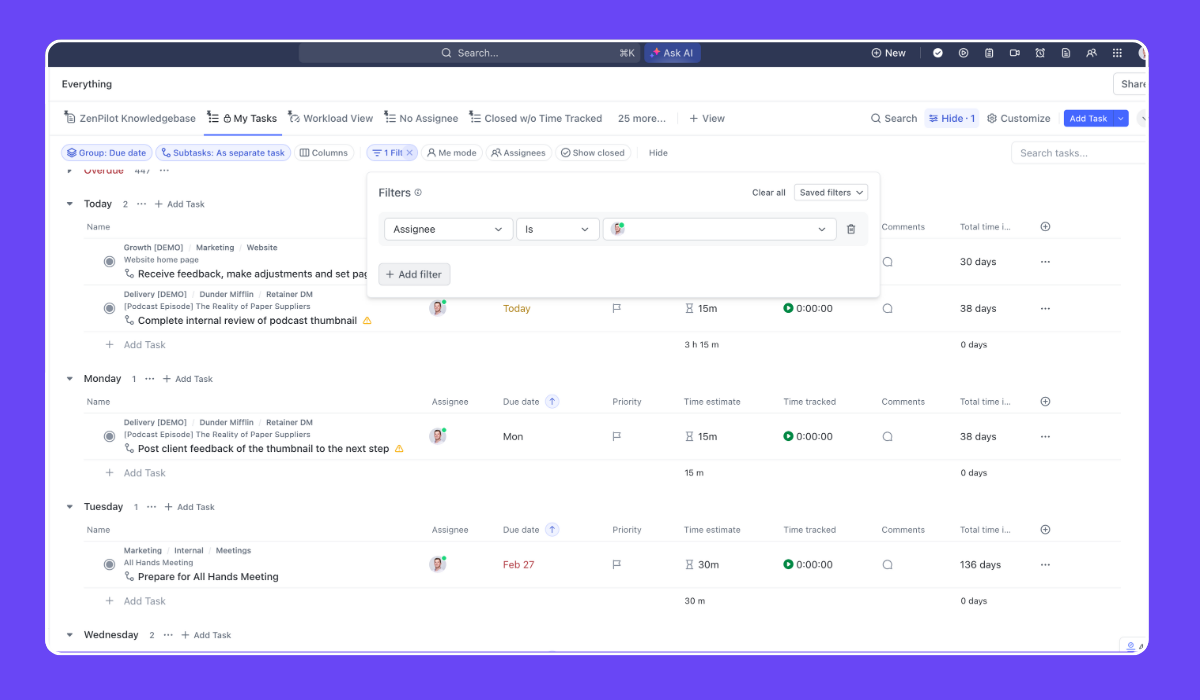
2. Workload View
For project managers, the Workload view is crucial for ensuring balanced workloads across the team. This view shows each team member's tasks, estimated time for each task, and task deadlines.
You can easily spot if someone has too much on their plate, or identify gaps where you can reassign work. The Workload view pulls in time estimate and assignee data, so it's important to make sure those are filled in for each task.
Related: 6 Steps to Accurate Workload & Capacity Visibility in ClickUp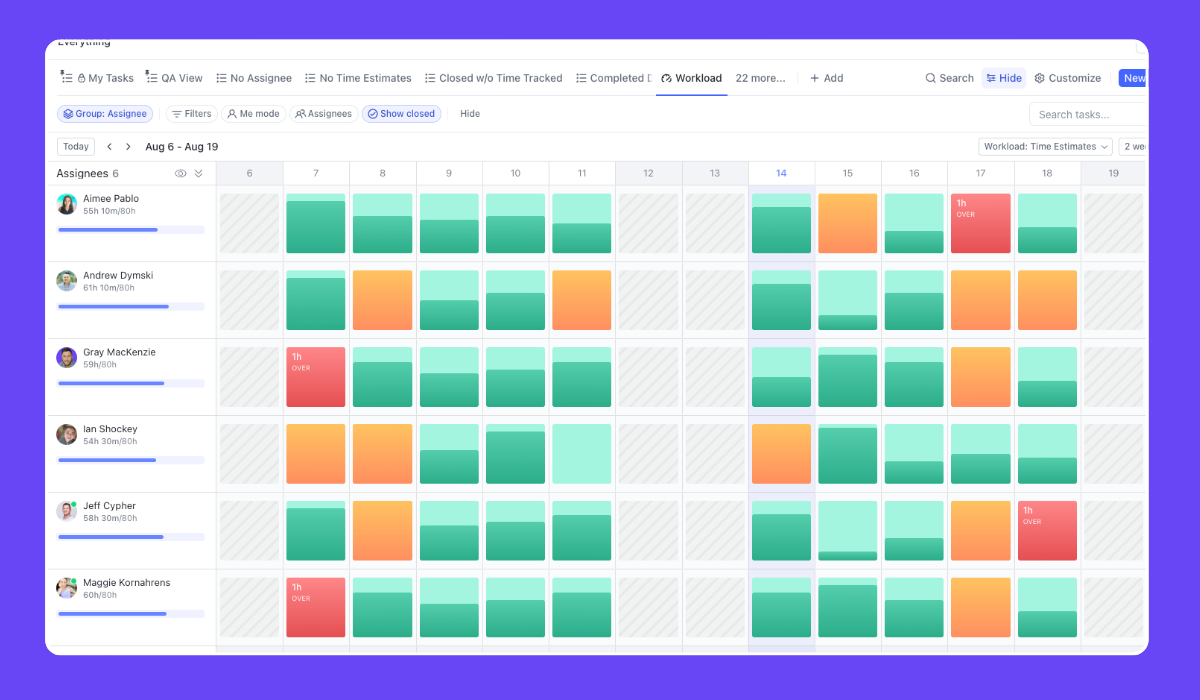
3. Campaign Status View
To track progress on a specific campaign, create a List view that filters for tasks tagged with that campaign.
Group this view by status to see what's in progress, what's complete, and what's coming up next. For an even higher level view, create a Table view that pulls in key data points for each task like assignee, due date, and time estimate. 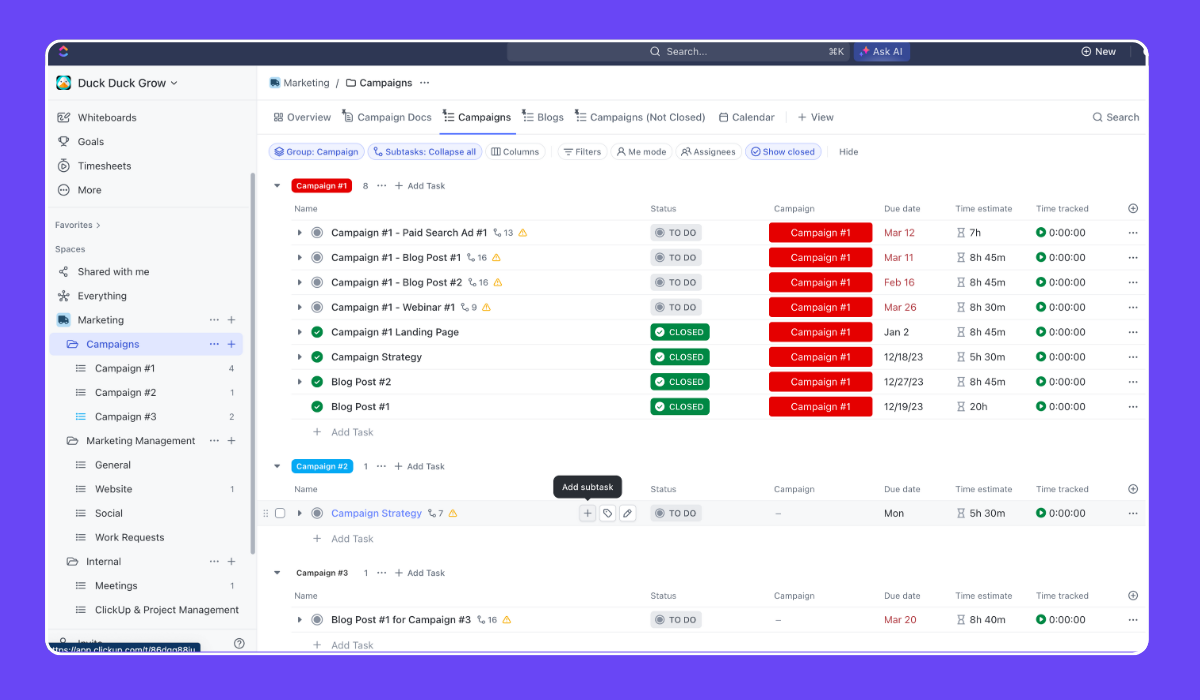
4. Content Calendar View
For a bird's eye view of your upcoming deliverables, create a Calendar view. This view plots your tasks on a calendar based on their due date. You can filter this view to only include tasks of a certain Work Category, like blog posts or social content.
This is a great view to share with stakeholders so they can see what's coming down the pipeline.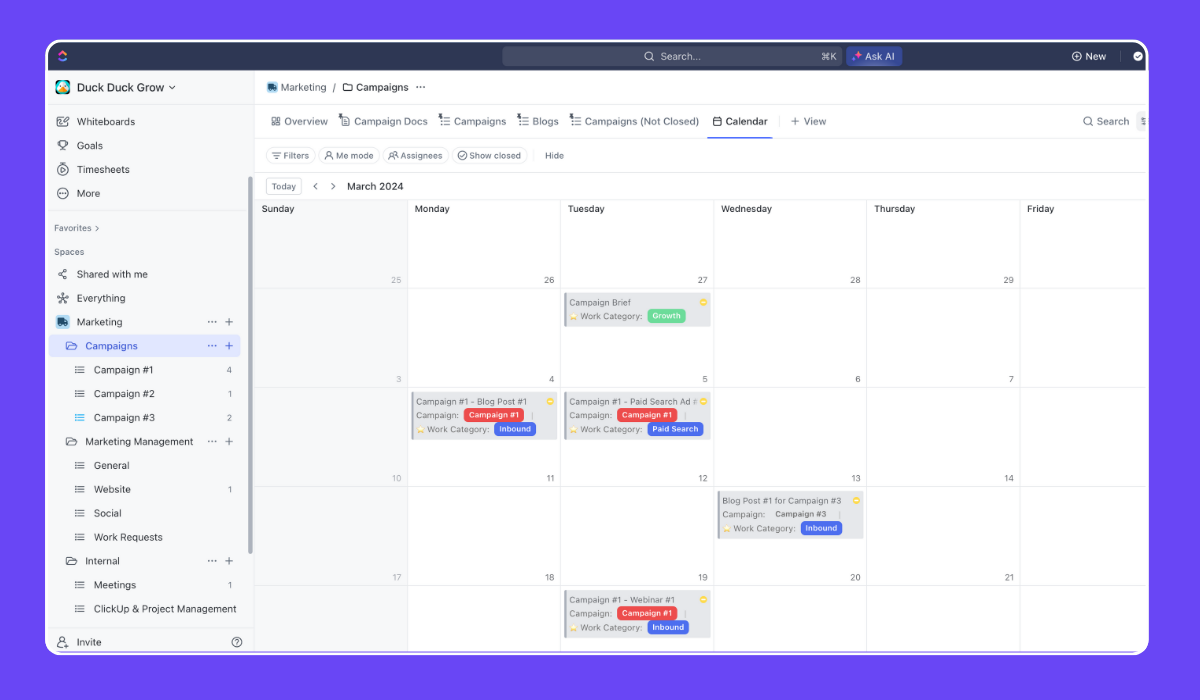
Remember, the beauty of ClickUp views is that you're not limited to the defaults. Play around with filtering and grouping by your custom fields to create the views that make the most sense for your unique workflows.
Using ClickUp Dashboards to Report on Marketing Campaigns
In addition to views, ClickUp's Dashboards provide a high-level overview of your work and results.
Dashboards are particularly useful for keeping tabs on the performance and results of your marketing campaigns.
Here's how you can set up a Campaign Dashboard in ClickUp:
- Create a new Dashboard in your workspace and name it after your campaign (you could also build this at the campaign list if you'd like!)
- Add an embed card to embed your campaign plan in the dashboard. You're embedding ClickUp into ClickUp. Just copy the link from your campaign brief you created earlier and put it in the dashboard so that it's visible here.
- Add a task list card and label it "Upcoming Deliverables". You'll filter down all tasks that are not yet complete and are associated with your campaign.
- Now, add another task list card and label it "Closed Deliverables". You'll filter down all tasks that were closed and are associated with your campaign.
- After you have the completed and open work, integrate data from outside sources to track campaign performance. ClickUp allows you to embed screens from other tools like HubSpot, Databox, Google Analytics, etc. You could embed a spreadsheet tracking your campaign budget, a Hubspot dashboard showing website traffic and conversions, or a Databox visualization of social media metrics.
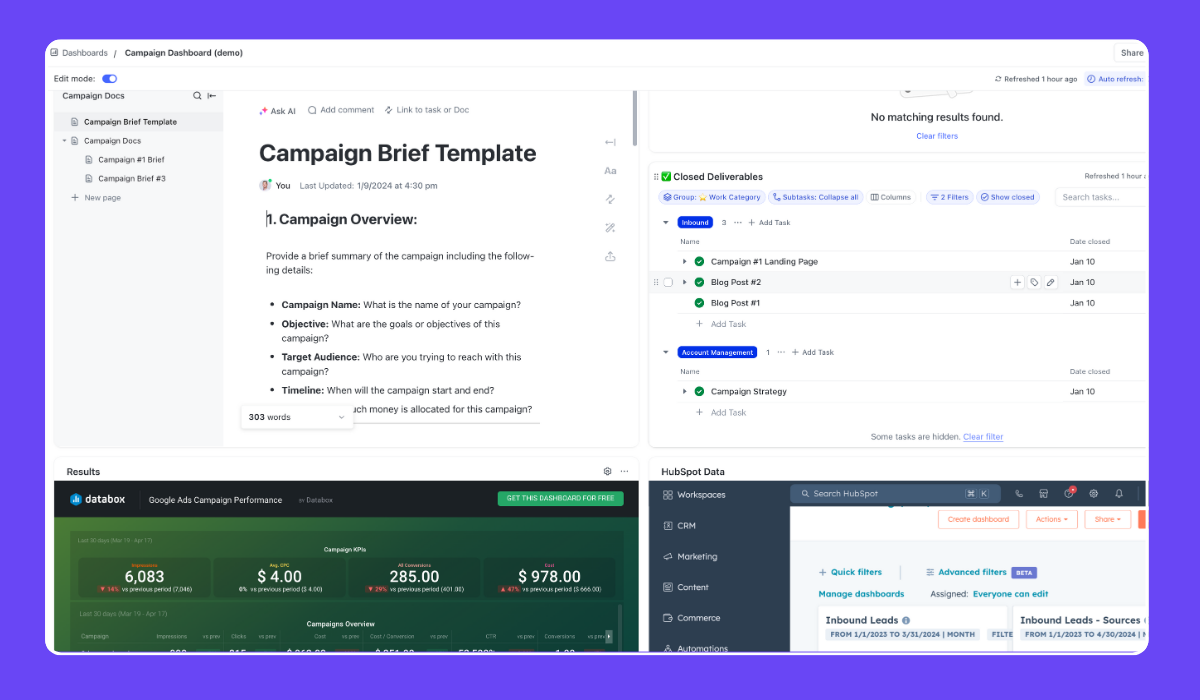
If you'd like to also manage work in this dashboard, rather than just see what's happening, happened, and the results, you could also add in some additional cards to track workload, overdue tasks, team performance, etc.
For example, you could add in another task list card that shows only the overdue tasks that your team has. This helps funnel all overdue work to one spot so that you can manage this work accordingly—whether you're reassigning or deprioritizing it.
Additionally, you could add in an activity view card to see all communication, or all due date changes in your campaign. This can help provide a birds eye view of everything that's happening from an activity standpoint.
By aggregating all this information in one place, your campaign dashboard becomes a central hub for tracking the execution and performance of the campaign. It's an easy way to keep all stakeholders informed and aligned.
Build a More Productive Marketing Team
ClickUp is an incredibly powerful tool for streamlining your marketing operations. By setting up your workspace with a thoughtful hierarchy, using custom fields to add context to your tasks, creating templates for repeatable processes, and leveraging custom views and dashboards, you can bring new levels of visibility, collaboration, and efficiency to your marketing work.
Remember, the key is to build a setup that works for your unique team and workflows. Don't be afraid to experiment and iterate as you go. With a solid ClickUp foundation in place, you'll be able to take your marketing operations to the next level.
To dive even deeper into ClickUp's capabilities, be sure to download our "How to Use ClickUp" guide.
And if you want expert guidance on optimizing ClickUp for your team, book a call with my team. We've helped 3,000 different teams streamline their operations in ClickUp to build more productive, profitable, and healthy teams.
Cancel chaos.
Create clarity.
You can build a happier, more productive, more profitable team with ClickUp. We'll show you how.


